Troubleshooting
Maintenance
Cars keep stopping
Track problems
How to troubleshoot C7039 digital lap counter
Lane change 'flipper' fails to operate

We recommend truing the tyres, even on new cars. To do this, hold the rear tyres against sandpaper whilst revving the car. This will remove any unevenness from the moulding process and increase the contact area with the track to improve grip performance.
Light cleaning of the track surface is recommended for daily use. Disconnect power before proceeding with any cleaning or maintenance. Dry track before reconnecting power. We recommend using a damp cloth or very lightly oiled cloth. This removes light grime and dust from the track surface. Wipe surface dry after using a damp cloth. As a matter of good practice, always do this before using the Scalextric layout as this will help ensure you get the best grip from the car tyres.
Use a mild abrasive material to shine up the running surfaces of the pick-up rails, making sure that the male and female connections at the ends of the track sections are also bright and shiny.
If the track is tarnished (dull) or has rust spots, all you need to do is give the metal parts, around the affected area, a quick clean. I personally use a PECO PL-41 Rail Cleaner Rubber. Click here to purchase. They are amazing and you will need one after every few times of usage to keep the rails shiny for maximum performance. Alternatively you can give it a rub with very fine sandpaper or wire wool etc although these aren't recommended but will be sufficient for just the once.
If you have a circuit and the car isn't running round, a method to find out which pieces of track are affected is just to join one piece of track to the powerbase track and run a car on it. You don't need a circuit.
If you are experiencing slippy tyres, try swapping the front tyres for the rear tyres. You can also add extra weights inside the car or extra magnets..
.
Cars keep stopping
First thing to do is check if your track is analogue or digital? You need analogue cars for analogue track and digital cars for digital track. If the car is buzzing then it is likely you have an analogue car on a digital track.
After checking you have the correct type of setup, it is important that you check the car before checking the track sections. If the car is running but keeps stopping then it is most likely the car's guide and braids. The braids are the two pieces of metal under the car (sometimes called brushes) the run on the rails of the track. The braids are fitted to the guide blade assembly. The braids allow electrical power to pass from the track rails, up through the braids and into the car. Any issues with the braids will result in the car not working correctly.
First, try holding the car at an angle with the braids on the rails and the rear wheels in the air to prevent the car driving off. See if you have consistent power.
Check:
1) The guide blade can rotate freely.
2) The car is correctly located in the slot of the track.
3) Both braids are making good contact with the track rails.
Adjust the position of the braids to make sure they are making the connection to the track and with the metal contact that they are touching, on the car. If the braids are really flat, you can puff them out a little to give more contact with the metal rails.
Check the rear axle is sat in the chassis' mounts. See video:

.
Track problems
If you've tried the solution above and the car is working well but it still sticks in certain areas then the next thing to check is the track.
A Scalextric track is an electrical circuit and power can 'leak' at every connection point in the layout. Therefore the next step is to ensure each piece of track has a good connection to the next piece of track. Sometimes part of Scalextric track layouts, looses power. The Scalextric cars run well on some parts of the track but slow down at other points.
Here are some solutions:
Keep the track as flat as possible.
Make sure there is no carpet fluff or debris between each track piece.
Make sure each track piece firmly locates with the next piece.
Keep the track clean. Clean both the rails and connectors after every few times of use or when you notice a reduction in speed.
Cleaning
Disconnect power before proceeding with any cleaning or maintenance. Dry track before reconnecting power. Use a mild abrasive material such as a PECO PL-41 rubber to shine up the running surfaces of the rails, making sure that the male and female connectors, at the ends of the track sections, are also shiny. Please be aware that sometimes, no amount of cleaning of heavily corroded rails and connectors will restore the track to a useable state. If the track cannot be restored, for example, if it is very rusty, replacement of the track is the only alternative.
Click here for track cleaner
Relocate
Frequently take up the track and relay it with the track pieces in different locations. This may sound pointless but it does work.
Improve connections
Disconnect the track from the power base track.
Connect the affected piece of track to the powerbase track. When testing track, if you wish, you don’t need a full circuit, just a piece of track connected to the powerbase track.
Next. Drive a car forward at a slow speed. When the car crosses from the powerbase track to the next piece of track, there should not be a drop in speed.
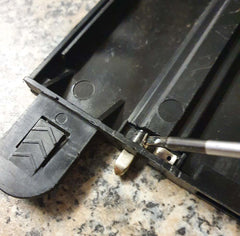
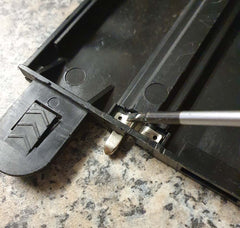
If there is a drop in speed, then fix the track connection: Disconnect both track pieces (the track piece immediately before and after the fault). Turn them over on a hard flat surface. Using a screwdriver, or similar, press down the metal tabs of the rails ensuring that they are fully pressed and clamped down to the plastic. This holds the rails in place more securely.
Reconnect the repaired track pieces and retest by placing the car at the powerbase and drive the car slowly, until you meet the next reduced or lost power section.
Continue the above repair process until full power is restored to all pieces of track.
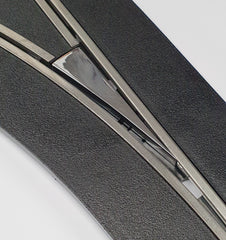
Push the flange down to tighten the connection
Connector pushed in firmly
If you feel the above process is not sufficient, you can go a step further: Using small pliers, slightly pinch the square box ends of the rails to squeeze the sides inwards slightly. This will make an interference for the connectors, so there is a slight bite when they engage. Do not squeeze too tight or you will not be able to reconnect the track.
Boosters
Finally, run a Scalextric track power booster cable around the track and make connections to the track every couple of meters or so. Just search on the word ‘boost’ on our website.
Warped track
If your Scalextric cars have a bumpy ride or struggle because the cars have ground out then the answer is to flatten the Scalextric track pieces. This can be done by leaving the track under heavy books overnight. Or you can reverse the bow in the track a little at a time over the edge of a table, until the track is visibly flat again. Be careful not to push too hard because then it will cause a kink in the rail and this is more difficult to restore. A kink will need reshaping by pushing it, at all angles, with a screwdriver, or similar until it is straight again.
.
How to troubleshoot C7039 digital lap counter

1) First, from the layout that you are testing the lap counter with, turn the power base over and look at the underside. If it says 'AZ1', then proceed to step 2. If it says 'A', unplug it, as it will not work due to being incompatible - This is a digital lap counter and 'A' means you have an analogue setup. If the power base says ARC Pro on the top then this lap counter will not work. Any other letters, please contact us.
2) Just connect the lap counter to the power base on its own. No other track. The power base is the piece of track that has the mains lead and throttles plugged into it. You should see the numbers light up on the lap counter. This means it is working.
Flashing random numbers occasionally
It might be worth having a look at your braids. Make sure that they are not too splayed out or sticking up. Also give you track a good clean with a vacuum as you might have little bits of braid lurking in the track recesses causing the track to short (bits of metal bridging the pair of metal rails).
The lap counter misses laps occasionally
Check the guide fins of the cars. If they are worn or not deep enough, they may not trigger the lap counter sometimes. The sensors in the track should pick up the car ID from the cars LED as it passes over, so you may need to clean the LED if it has become dirty. Check your braids as these can raise the nose of the car. If they are raising the car too much, it will not sit in the groove correctly. If none of these work, please contact us again with an exact description of the fault and which set it is being used with. Photos are very helpful.
.
Lane change track ‘flipper’ fails to operate
Disconnect the lane change track piece and check that the rail connections are all as per the above process.
Check that there is no debris or obstructions in the slot, preventing the flipper from physically moving. It should 'flip' freely.
Ensure the track piece hasn't been bent (for example, trodden on).
Reconnect the track piece and turn the power on.
Manually move the flipper into the position which would cause the car to change lane. Manually push a car over the track lane change sensor (this is a round hole about one car length before the flipper). The flipper should flip back to the 'straight ahead' position.
actionslotracing@gmail.com